Corn Silage Harvest Moisture and Proper Fermentation
September 27, 2023
Introduction
Corn silage is produced to help maintain forage nutrition for feeding cattle, both beef and dairy, well beyond the harvest date. To accomplish this, plant carbohydrates (sugars) are converted through fermentation into organic acids. Nutrient loss can be minimized through fermentation by proper management of harvest moisture content, chop length, air elimination, and the anaerobic bacterial population.
Management techniques to produce quality corn silage:
- Correct moisture content and maturity at harvest
- Proper chop length and particle size
- Maximized oxygen exclusion (silage density)
- Inoculated bacterial populations, both natural and supplemental
- Well managed storage and feedout phase
Phases of Fermentation
Phase 1: Plant Respiration
This first phase of fermentation begins as soon as the corn is chopped. Harvested corn will continue to respire for some time, and enzymes will continue to break down proteins for several hours after the corn has been chopped. This is the aerobic phase, the phase in which oxygen is still present in the chopped corn before packing has excluded the oxygen. During this phase, naturally occurring aerobic bacteria will consume available carbohydrates, producing carbon dioxide, water, and heat until the oxygen is excluded by the packing process and an anaerobic environment is created. Any carbohydrates consumed by the aerobic bacteria during this phase will no longer be available in the finished silage product for the feeding cattle to utilize. This is why a rapid, uniform, and complete packing process is so important for proper fermentation to occur, to minimize the time available for aerobic bacteria to reduce the silage quality. After packing, the storage system is immediately sealed with an oxygen barrier that will prevent oxygen from re-entering the silage during the following phases of fermentation and storage.
Phase 2: Acetic Acid Production
After packing and sealing, the absence of oxygen allows anaerobic, acetic acid-producing bacteria to begin multiplying. These naturally occurring anaerobic bacteria start the process of converting carbohydrates in the chopped corn into acetic acid, which is an important ensiling step that reduces the pH of the silage. This phase takes two to three days and drops the pH from six to five. The drop in pH reduces further activity of the acetic acid-producing bacteria.
Phase 3: Initial Lactic Acid Production
This phase begins as soon as the pH of the silage drops below five. This lower pH causes a continued decline in the numbers of acetic acid-producing bacteria but increases the growth rate of other anaerobic bacteria that convert carbohydrates into lactic acid, ethanol, mannitol, and carbon dioxide. A strain of bacteria that only produces lactic acid becomes important to the fermentation process as the pH continues to drop. This lactic acid-producing bacteria continues to drop the pH even lower and progresses the ensiling process. When the pH drops rapidly and lactic acid is the predominant fermentation biproduct, high quality corn silage is produced.
Phase 4: Peak Lactic Acid Production and Storage
This is the longest phase, which takes a minimum of 14 days in ideal environments. The anerobic, lactic acid-producing bacteria continue to be active until the pH drops to four or below at around 21 days, which is when all bacteria growth stops. The fermentation process is now complete, the silage is now in a relatively stable condition, and it will provide the grower with a quality feedstuff for the next year or longer if the silage is not exposed to oxygen.1
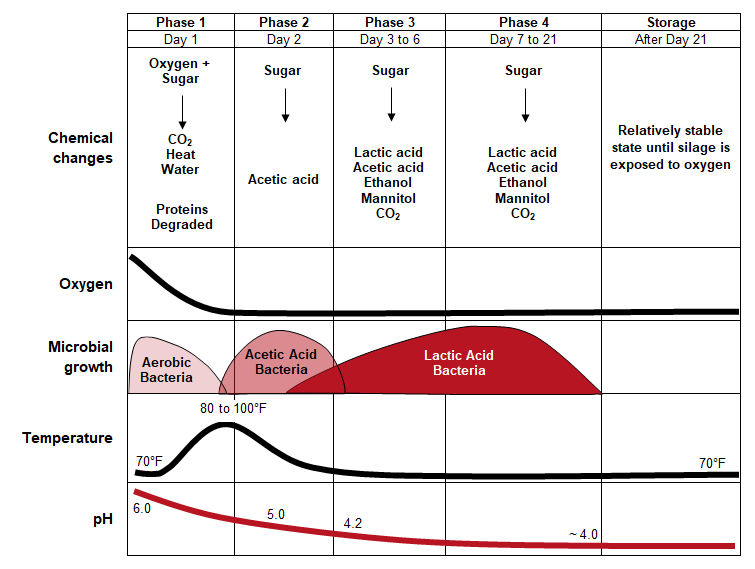
Figure 1. Phases of normal fermentation.1
Harvest Moisture
For proper fermentation to occur during the ensiling process, silage harvest will need to take place when the crop is at the proper moisture content and maturity stage. This allows for:
- Proper packing and oxygen exclusion
- Increased nutrient yield potential
- Reduced losses in the field and in storage
- Increased animal consumption and palatability
- Reduced seepage
Corn should be harvested when the whole-plant moisture is around 55 to 70 percent. Exact moisture content depends on the storage structure used (Table 1).
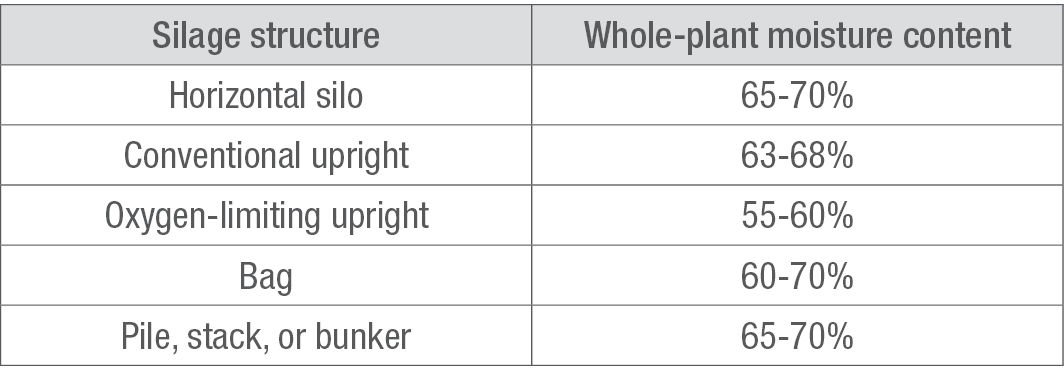
Table 1. Recommended whole-plant moisture content of corn harvested for silage by storage structure.1
How to Determine the Correct Silage Moisture for Harvest
Corn silage quality is more accurately determined by whole-plant moisture content than by corn maturity stage but understanding both methods can help the producer determine the optimum time to harvest. One common method for determining plant moisture by maturity is to determine where the milk line is in the kernel. The milk line in the kernel is indicated by a whitish line that divides the hard kernel starch and the liquid starch material (milk). At one-quarter milk line, the line will exist 25 percent of the way down from the top of the kernel (Figure 2) and all kernels will be dented. At one-half to two-thirds milk line (Figure 2), many corn products will be between 65 and 70 percent whole-plant moisture. At black layer, when the milk line is no longer visible, whole-plant moisture will be about 55 to 60 percent, while the grain will be around 25 to 40 percent moisture. As the corn approaches black layer, grain content increases but starch digestibility decreases.
This method of determining plant moisture by plant maturity can help a producer estimate the moisture, but it is only an estimate. Many factors can affect how accurate this estimate is. Differences in corn product staygreen, hail damage, disease levels, and weather conditions (including drought) are all factors that can affect plants and change the relationship between milk line and whole-plant moisture.
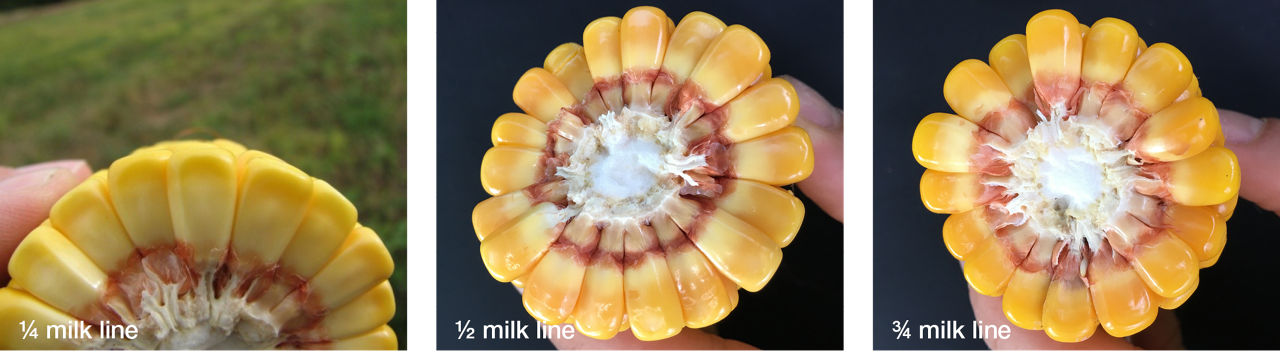
Figure 2. Corn maturity stages by milk line.
Once silage corn matures to one-quarter milk line, whole-plant moisture should be tested to help decide when to harvest. One-quarter milk line typically occurs when the corn crop is around 70 percent moisture content. To test whole-plant moisture, the plant is chopped, weighed, completely dried, and then weighed again. Dry weight is then compared to fresh weight to determine moisture content. This can be done on-farm (with appropriate tools and methods not detailed here) or at a lab. For most corn hybrids in optimum growing conditions, the drydown rate is approximately 0.5 to 0.6 percent per day. There are, however, many factors that can cause quicker or slower drydown depending on daily temperatures, moisture stress, spider mite pressure, soil type, disease pressure, or the corn product (some corn products may have more staygreen and are healthier through maturity, which often results in higher whole-plant moisture). Use the drydown rate, the moisture content, and the type of storage being used to estimate the optimal day to begin silage harvest. For example:
If corn whole-plant moisture content is measured at 70 percent moisture, and the ideal moisture content is 65 percent for the silage pile that will be used for storage, then a total of five percent moisture drydown is needed.
When a five percent drop in whole-plant moisture is needed and the estimated drydown rate is 0.5 to 0.6 percent per day, it is estimated to take eight to ten days until harvest (5 ÷ 0.6 = 8.3 and 5 ÷ 0.5 = 10). It is important to monitor crop maturity every couple of days to determine how rapidly the crop is drying down.
Chop Length
The theoretical length of chop (TLC) for unprocessed corn silage is 3/8 to 1/2 of an inch, while processed corn silage (harvested with a kernel processor on the chopper) should have a chop length of ¾ of an inch. If the silage is chopped too fine, it can result in inadequate effective fiber in the ration.
Proper Silage Density (Packing)
While gravity compacts the silage in a conventional upright silo—except for the very top layer which will need to be manually leveled and packed—it is important to fill these structures rapidly and evenly, harvesting at the correct moisture and chop length. These steps are critical to minimize the time that aerobic bacteria have to consume carbohydrates and reduce the silage quality before the oxygen is excluded.
When silage is stored in a horizontal structure (i.e., bunker, bags, or silage piles), mechanical compaction is needed for oxygen exclusion. There is only one opportunity for a grower to get the chopped corn to the proper density for storage in these structures, and that is when the silage is pushed and packed at the time of delivery. To achieve adequate silage density for storage in piles and bunkers, the packing vehicle’s weight and the thickness of the layer of silage being packed must be taken into consideration. Thinner layers, less than six inches deep, pack quicker and more uniformly than thicker layers, which is critical for complete oxygen exclusion.
When determining the packing weight needed to achieve the minimum packing density of 14 lb/ft^3 (which indicates an oxygen-free silage product) it is critical to determine the rate at which the chopped corn will be delivered to the silage structure. The combined packing vehicle weight of this equipment determines the maximum fill rate (tons/hr). If additional harvesting equipment is added, the fill rate will increase and in turn require additional packing equipment to push and pack at this higher fill rate.
Filling rate, or weight of tractors used to pack silage, can be calculated using these equations:
Optimum filling rate (tons/hr) = Vehicle weight (lb) / 800
Optimum packing vehicle weight (lb) = filling rate (tons/hr) X 800
(Calculations to achieve minimum packing density of 14 lb/ft^3) 2
Using Inoculants to Supplement Natural Ensiling Bacteria
One type of silage inoculant contains anaerobic bacteria that produce lactic acid which, as mentioned above, will help to rapidly drop the pH of the silage to four or below to complete the fermentation process. The ideal result of silage fermentation is the production of higher levels of lactic acid and lower levels of acetic acid. Inoculants can be used to improve the ensiling process for silage that has been chopped at less than optimum whole-plant moisture and can reduce dry matter losses by 2% to 3% in a well-managed bunker or pile. These supplemental inoculant bacteria have been selected to grow rapidly and efficiently, resulting in an increased fermentation rate. However, not all conditions are conducive for the use of supplemental inoculation. The success of an inoculant is determined by the size of the natural population of live lactic acid bacteria on the corn at harvest. The higher the natural population is, the more difficult it is for the non-native (inoculant) bacteria to outcompete the native bacteria and aid in fermentation. Additionally, natural populations of lactic acid bacteria do not grow well under dry conditions, suggesting that inoculants may be more successful with drier crops. If inoculation is successful, the shift in fermentation products (higher lactic acid and lower acetic acid) should increase animal feed efficiency since animals can utilize lactic acid more efficiently than acetic acid.
Managing the Storage and Feedout Phase of Corn Silage
It is important to monitor the stored silage until it is fed to cattle, and to pay particular attention to if the oxygen barrier has been damaged or removed. A damaged oxygen barrier would allow oxygen to enter the silage and cause spoilage (aerobic deterioration) by permitting the growth of aerobic bacteria, yeasts, and molds. Silage temperatures increase whenever oxygen is available and these undesirable microbes start to grow. A silage temperature higher than 20 °F above ambient temperature indicates extensive respiration by these spoilage-causing microbes, leading to a reduction in feed quality that can negatively affect animal health and performance. This increase in silage temperature can also occur during the feedout phase when silage is removed from storage but not fed the same day, or when a large, open face on a silage pile is exposed for multiple days.
Factors That Can Cause Improper Fermentation
Spoilage, or improper fermentation, can be caused by several factors. Feeding even small amounts of spoiled silage can reduce feed intake, which shows up as decreased milk production in dairy animals and slower weight gains in beef cattle. Additionally, feeding spoiled silage can harm the health of the feeding livestock, causing respiratory problems and other general herd health issues.3 Because of these risks, it is important to avoid factors that can cause improper silage fermentation.
Corn harvested at the incorrect whole-plant moisture can be a primary cause of improper fermentation. When corn is harvested at too low of a whole-plant moisture content, it becomes very difficult to remove all the oxygen from the chopped corn even when additional packing equipment is used. In many situations, trying to add moisture to overly dry corn silage at harvest is not feasible because of the volume of water that would need to be added at the rate the chopped corn is being delivered to the silo or pile.
Corn harvested at too high whole-plant moisture can also cause poor fermentation. When corn is harvested at too high of a moisture content for the type of silo, seepage can leak away from the silage structure. This seepage, also referred to as effluent or leachate, is a byproduct that reduces silage quality by removing carbohydrates and nutrients, particularly soluble nitrogen.
An incorrect chop length can also cause fermentation problems. It can be very difficult to remove the trapped oxygen from corn chopped at too long of a chop length, which can result in incomplete fermentation and also cause seepage issues. (Though note that, as previously mentioned, if the silage is chopped too fine the final product may have an inadequate effective fiber content.)
The harmful effects of oxygen in silage are discussed in the previous section. It is a best management practice to cover the silage with an oxygen barrier covering as soon as possible after it is piled and packed. Any delay in covering the silage structure can increase storage losses.
For more information on silage, contact your local Bayer representative.
Sources
1 Jones, C.M., Heinrichs, J., Roth, G.W., and Ishler, V.A. 2023. From harvest to feed: Understanding silage management. Pennsylvania State University Extension. https://extension.psu.edu/from-harvest-to-feed-understanding-silage-management
2 Amaral-Phillips, D. 2015. Time to make the silage. University of Delaware. Cooperative ExtensionReminders for corn silage chopping time. https://sites.udel.edu/canr-animalscience/2015/08/20/time-to-make-the-silage/
3 2019. Ask the quality silage experts: What to do with spoiled silage. Lallemand Animal Nutrition Dairy Herd Management. https://www.dairyherd.com/news/business/ask-quality-silage-experts-what-do-spoiled-silage#:~:text=Feeding%20even%20small%20amounts%20of,fiber%20degradation%20in%20cattle%20occurs
1210_179723
Disclaimer
Always read and follow pesticide label directions, insect resistance management requirements (where applicable), and grain marketing and all other stewardship practices.